Light changes a landscape photograph even when the mountains, trees and horizon stay in place. To study it, begin with the finished image rather than a rule about the “best” hour. Find its brightest area, then follow the shadows. Ask where forms separate and where they merge. Only after that should you guess which direction the light might have come from.
This is a viewing method, not an account of how the photographs in this collection were made. The recovered files are small, and their camera settings, original exposure and precise time of capture are not documented here. They can still teach a useful distinction: what the image visibly shows is firmer evidence than a story we attach to it.
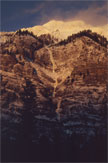
Collection photograph © Heath A. Korvola / nomad photography.
1. Start with what is visible
Cover the caption and look at a landscape for ten seconds. Write down three observations without naming a time of day: “bright rock at the top,” “dark slope below,” “thin light near the skyline.” These are statements another viewer can inspect in the same file. “Late afternoon” may be a reasonable possibility, but a small photograph alone may not establish it.
Now identify the largest area of light, rather than the brightest pixel. A tiny glint can catch your eye without shaping the whole scene. In the mountain image above, the light at the upper ridges forms a broad band, while most of the lower frame remains dark. That relationship gives the rock an edge against its surroundings. You do not need to know the precise exposure to describe it.
Next, ask whether the bright and dark regions have hard or gradual boundaries. A narrow illuminated crest can make a ridge distinct; a softer change may leave one hill blending into another. The answer is about this reproduced image. The original photograph may have held more tonal detail than the small file shows.
Adobe's guide to highlights and shadows describes bright and dark areas as part of a photograph's tonal range. Its practical advice is aimed at making and editing images; here, the same vocabulary helps us read an existing picture. We are observing relationships, not diagnosing whether an archived file was correctly exposed. The dated source and claim notes for this field note are kept with its editorial research record.
2. Trace direction through clues, not certainty
To infer light direction, look for repeated clues: one side of a rock brighter than another, a shadow extending away from an object, or several forms illuminated along similar edges. One clue can mislead. A pale surface may appear bright because of its material rather than because it faces the light. A dark area may be shaded, but it may also simply reproduce with limited detail.
Nikon's landscape guidance notes that sidelight can separate elements in a scene. This offers a useful question for the viewer: do lit and shaded faces make adjacent forms easier to distinguish? It does not prove that every striking landscape uses sidelight. A silhouette against open sky can work by almost the opposite relationship: the subject is dark, and the background carries the light.
Try tracing the outline of the main subject with your eyes. Which part remains legible because the background behind it is lighter? Which part disappears into a similar tone? In the Montana Mountains collection, compare the tree silhouetted against the sun with the tree standing before distant mountains. Both show a tree, yet the surrounding light gives each a different edge. This comparison is more precise than saying one photograph has “good light” and the other does not.
If you cannot confidently locate the source, leave the question open. A sky can be bright in several directions, and a low-resolution reproduction does not offer a complete map of the scene. The useful observation is often the effect of light within the frame, not a compass bearing for the sun.
3. Compare contrast at two scales
Contrast is not only the gap between the lightest and darkest marks in the entire picture. It also occurs locally, where a tree meets the sky or a ridge meets another ridge. A photograph can have a bright sky and dark ground while the main subject still blends into its immediate background. Conversely, a modest overall range can contain a small, clear boundary that draws attention.
Make two passes. In the first, half-close your eyes and see whether the frame becomes a few large blocks. In the second, look closely at the boundary around one subject. Write separate notes for overall and local contrast. A broad dark lower half might anchor the image; a thin bright rim might identify a particular rock. Neither observation needs to become a quality score.
Adobe explains that highlights and shadows may retain different amounts of detail and that altering them changes the picture. For a historical web-sized image, avoid treating a nearly black region as evidence that the photographer “lost” detail. We do not have the original negative or master file. The reproduced darkness may be a printing, scanning or compression choice, or it may have been present in the source image. The safest reading is simply that the dark region contributes little visible detail in this version.
Notice how contrast directs the order in which you look. Your eye may travel from an orange strip of sky to a dark horizon and then to a slender object crossing it. That route is an interpretation of the visible arrangement, not a measurable law about every viewer. When comparing photographs, record the route you actually follow instead of asserting that everyone must follow it.
4. Put two Montana frames side by side
The Glacier ridge photograph and the Bozeman sky below make a useful pair. One places bright rock against dark mountain; the other gives a large share of its area to warm sky above a dark, almost continuous line of hills. Both contain light and dark, but they distribute attention differently.
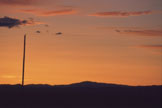
Collection photograph © Heath A. Korvola / nomad photography.
In the ridge photograph, ask which illuminated peak you notice first and whether your eye then moves along the crest. In the Bozeman photograph, ask whether you read the sky as one broad field or stop at the small dark forms along the horizon. The two files are different sizes and depict different scenes, so this is a comparison of visible relationships, not an experiment that controls every variable.
You might be tempted to label one image “golden hour” and the other “too dark.” The Bozeman caption identifies the location; it does not supply a clock time. The warm colour suggests a kind of light, but colour in a recovered file may not exactly match the original scene. The dark hills are part of the composition we can see, regardless of whether a larger source file would reveal more there.
If you prefer one frame, explain the preference in terms of its effect: “The isolated illuminated ridges help me inspect the shape of the mountain,” or “The open sky gives me more room to notice the horizon.” Preference becomes useful when it names a choice you could make in your own photograph.
5. Make a small light study of your own
Choose a familiar subject you can photograph safely and appropriately from the same spot on two occasions. A wall and a tree, a garden corner or a view from a window will do. Before taking the second frame, decide what you want to compare: the shape of a shadow, the separation of a subject from its background, or the amount of visible detail in a bright and dark area.
Keep the frame as similar as practical. Then write one sentence for each photograph under the headings brightest area, darkest area, subject edge and first point of attention. You are not testing a universal formula. You are giving yourself a way to observe how changing light changes the result. If the viewpoint or weather also changes, note it instead of pretending the comparison isolates light alone.
Adobe's landscape guidance emphasises that weather and the sun's angle alter the available light. Nikon likewise recommends allowing time to see light change in a scene. Those sources explain why a repeated visit can produce a meaningful comparison; this four-note worksheet is our own editorial exercise.
Afterwards, decide which frame better serves your stated purpose. A dark foreground may remove detail yet make a bright ridge stand out. A more even light may reveal texture you wanted to show. Neither outcome is automatically superior. The decision depends on what you intend the viewer to notice.
6. Keep the limits of the image clear
The collection's original captions identify places, not camera settings or the photographer's current interpretation. Respect that boundary. Do not claim a precise hour, weather condition, editing method or equipment choice from a small JPEG unless the source supplies it. Do not assume that a landscape shown here can be reached safely or photographed from the same position today.
For a broader way to study an image before making your next frame, use our seven-part composition worksheet. It begins with attention and edges; this note narrows the exercise to light. Return to the North American West collection and compare the sunlit mountain ridges there with the Montana pair. Name what you can see, mark what remains uncertain, and let those observations guide your next deliberate frame.